OFFICIAL SITE RELEASE DATE: Christmas Day (December 25th)
Mix Window

Pro Tools has two main windows: The Mix Window and the Edit Window.
The Mix Window is the window in Pro Tools that you will do most of your mixing (Hence "Mix" window).
In the Mix Window you will have all your channels displayed in an organized, vertical view.
Before we get started, remember, Pro Tools is very customizable. The Pro Tools screens you see here may look different from yours. Don't worry, I'll teach you how to customize Pro Tools to your liking. (Also keep in mind that we have Pro Tools 11, which looks much different from previous versions. Don't worry, everything is still the same.)
Your Mix Window may look something like this:
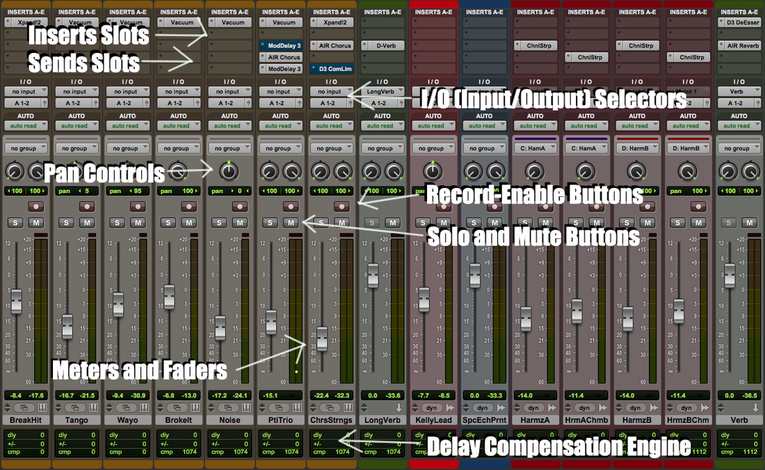
Faders: These are main volume controls of the channel. Slide them up for more volume or down for less volume.
Meters: These are the strips to the right of the channel fader that show you folume level.
*There are two types of meter types: Pre-Fader Metering and Post-Fader Metering. Pre-Fader metering is metering that shows you the volume of the signal BEFORE the fader affects the volume. This is best for using when recording audio because it shows you exactly the volume of signal coming into ProTools. Post-Fader Metering shows you the volume of the audio signal AFTER the fader has affected the volume, this is usually best for mixing.
Pan Controls: These simply control how much audio signal on that channel goes into the left speaker, right speaker, or anywhere in-between. On Stereo Channels you have 2 pan controls: one on the left for the left signal and one on the right for the right signal. Usually, you would want to keep the left signal control to the left, and the right to the right.
Record-Enable Buttons: These are only found on Audio Tracks (Tracks that are able to contain audio). When these are pressed in, it indicates that you want to record audio on that track, and audio will record when the Master record button is pressed in and you press play.
Solo Buttons: These are the button(s) that you press on a channel when you want to hear just that channel.
*If you press a solo button and you hear nothing, check to see if you have that audio going through a Bus Track. If so, the Bus Track, too, will need to be solo-ed to let the audio through it. In order to prevent having to solo the Bus Track in addition to the other track every time, you can hold down the Control Button (WINDOWS) or Command Button (MAC) and click the solo button on the Bus Track. This makes the track solo-ed by-default, so if you press solo on any other track, that track, too, will be solo-ed automatically.
Mute Buttons: These plain and simply, mute the track.
I/O (Input/Output) Selectors: These drop-down menus are where you select there the track signal comes from, and where it goes.
*Every different track type (See Tracks and Track Types) will have different I/O options and principles.
On an Audio Track, you can select the input from your Interface that you want to record from, record the audio and then forget about the input, because that audio for the track is recorded on it, and it doesn't need another input source. (Of course you can re-record onto the track as many times as you want.)
On Bus Tracks, you select where the audio comes from, usually a Bus, and the audio simply runs through the track (and gets processed) and then runs out the outputs.
On instrument tracks, The Input usually is where you select a midi-keyboard-controller that will create midi data for a virtual instrument to play. Like the audio track, after you have recorded you can forget about the input because the data is already recorded on the track.
On Master Tracks, there is on I/O selector, this selects the signal that it controls, or is the Master of. Audio does not realy run through it, as much as it is a Master of it.
Insert Slots: These are the slots where you insert Plug-Ins into the signal chain of the Track. Each Track has 10 Inserts (Inserts A-E, and F-J). The signal flow of inserts goes in order, from A to J, in and out of one and into the other in exact order. This is handy to know when you are adding and working with the Plug-Ins because the signal output of one plug-in runs into the input of the next (following a chain).
Sends Slots: These are where you can send a copy of the channel's output signal to another location: Either an output on your interface or a Bus inside of Pro Tools.
Delay Compensation: Some Plug-Ins cause the audio to be slightly delayed because they need some time to process the audio. The "Delay Compensation Engine" in something built-in to Pro Tools that recognizes this delay and compensates for it automatically. The delay compensation engine section simply displays the delay on a track and/or the compensation the engine is doing.

Automation Controls: Automation is that ability to automate, or pre-determine the location of a certain control. The Automation Controls determine that state of the Automation for that channel, either Read where it reads recorded Automation, Off where it ignores any recorded Automation, write where it writes (or records) new automation by you moving the Control as it play the track, recording the changes.
Groups: Groups are very handy tools to group many channels together. Whenever you group channels together, they all work in conjunction with each-other. Example: if you move a fader on one channel, the faders on the other channels move in the same direction and in proper proportion.
Groups: Groups are very handy tools to group many channels together. Whenever you group channels together, they all work in conjunction with each-other. Example: if you move a fader on one channel, the faders on the other channels move in the same direction and in proper proportion.
View Menu
Up in the Menu Bar, you will see "View". Click on that and you will see "Mix Window Views". Here you can select what components of the Tracks you want to view in the Mix Window.
From this menu, you can select to view:
Mic Preamps
Instruments
Inserts A-E
Inserts F-J
Sends A-E
Sends F-L
*Meters and Faders (<Only Pro Tools 11 users will see this option)
Delay Compensation
Track Color
Comments
Instruments - This is the option to view the virtual instrument on a instrument track. This appear on the very top.
Track Color - This simply is the option to see the track colors to just have it boring a gray.
Comments - Each track contains a comments section where you can leave comments on the track, like what mic you used to record the audio recorded on it, for example. The comments alway appear on the very bottom.
_____________________________________________________________________________________________________________________________________________________
Right under "Mix Window Views", you have another option, called "Narrow Mix". Enabling this option makes all the channels thinner, allowing you to see more on your screen at one time.

Tips/Tricks
Changing Track Color
First, make sure you have the Track Color on in the view list for the Mix Window.
Next, Double click on the color tab of one of the channels.
First, make sure you have the Track Color on in the view list for the Mix Window.
Next, Double click on the color tab of one of the channels.

From the Menu, you can select the color, overall session color saturation and brightness and if you want the hole track to be colord, as well. You can always bring the color back to default and select no color.
Changing Track Names
Double-Click on the track name.
Changing Track Names
Double-Click on the track name.

From the Menu you can change the track name add comment (which will appear in the comment section of the channel, if you choose to view comment in the view menu)
Press "Ok" to confirm the change, "Next" to confirm the change and go to the next channel, or "Previous" to confirm the change and go to the previous channel.
Changing Meter Width
You can change the width of the meters in Pro Tools by simply holding down all the edit keys (control + option + command = Mac) and clicking on any channel meter.
Cool. Now lets keep going:
